Fall Crafts…

p1080025


As I drove down the side road the other day  I noticed all those -wild- apple trees just loaded with small apples, some of them are crab apples I believe. This is where the idea came from to turn some of those apples  into a wreath and use them to decorate around the entrance to our house. Maybe you’ll go for a walk or a drive this weekend also? They are free and who does not like free? ;-). After they don’t look so good anymore I’ll take them off the wire and they’ll end up in the compost!

All you need is a strong wire (you decide how large the wreath will be) and some pliers. It will take you 10 minutes max! Bend one end of the wire into a loop and with the other side you start “threading” the apples by poking through the sides of each apple and coming out the opposite side. Keep going until the wreath is almost full; join the two ends of the wire and bend into a second loop with the pliers, voila! As always if you  have a question about this; please ask.


Sedum wreath…

My garden is full of beautiful Sedum  and as I am kind of on “call” today on the farm and have to stay put, I started this project outside on the porch on this gorgeous day! It did not take much time to finish at all; maybe 1/2 hour! All you need is:

  • Some Sedum (3-4 big heads)
  • Wire (that won’t rust)
  • Pliers
  • Scissors
  • Twine

You start by making a loop with your wire and join the ends. (You decide how big or how small your wreath will be). Next you snip 2-3 handfuls of small Sedum florets  Tie your twine  securely onto the wire and start wrapping 2-3 florets stems at the time. Wrap tightly. Keep going until you are all around the whole wire ring! Knot the string tightly and snip it off. Now place your wreath in a dish with some water and enjoy it for a while…..wreath1a

Ups…and some twine…

twine


img_6072

Find a nice plate,  add some water and place your wreath in it… and maybe a candle or something else?


img_6062wreathinplate


wreathhanging

As always; if anything is unclear or you have a question just drop me a line….

Happy Sunday!

Swiss style Herbbutter

My mom always made this herb butter, and it is what we put on our steaks. We did not have steak sauces and such when I grew up (guess that tells you something about my age, ouch)…

My own family loves it also so when I make it, I make a large amount; after all it is a bit of work. ;-). There is literally hundreds of different recipes out there but here is mine:

  • 4 pounds of salted butter, cut up and softened
  • a  bunch of chives, (about 1 1/2″ in diameter)
  • a bunch of parsley, (see above)
  • 5-6 sprigs of fresh Rosemary, taken off stems and chopped finely
  • about 10  leaves of sage, chopped finely
  • a bunch of oregano, taken off stems and chopped finely
  • a bunch of thyme (see above)
  • 2 whole garlic bulbs, peeled and minced (w.garlicpress)
  • about 1 tbsp. of fresh ground pepper
  • 1 tsp. of turmeric
  • some paprika

You noticed I did not always give exact amounts. If you don’t like one or the other herb; leave them out. Chop all the herbs and add all the other ingredients and mix well with the butter. If possible in a food processor as this is the least messy method.

You can now either make “Rosettes” like I did. I like them because this way I can take the amount out of the freezer that I want. I put them onto a parchment paper lined baking tray and freeze them. Once frozen I take them off and put in a large Tupperware container and place back into the freezer.  You could also form a few logs, about 1 1/2″ in diameter, and wrap into parchment paper. This way you can just cut off what you need.  You can also put portions in smaller Tupperware containers to freeze as well. This butter is excellent to use like you would use a store bought garlic butter!

(You don’t need to make 4 pounds like I did, i just prefer to make it in bulk. It is also something you can bring to a BBQ party as a Host/Hostess gift etc).

If you have a question please ask!

Temporary Decoupage anyone?

Should you happen to have some old windows around, like the ones in my pictures, great. If not, you can still do this on any window (or mirror)  in the house also! We are -temporary decoupaging-!

This is what you’ll need:

  • Some fancy paper napkins of your choice
  • scissors
  • small brush for water (makes ripping the napkin easier)
  •  larger brush (like your baking brush for the “decoupage”-part)
  • egg white (straight from the egg, not whipped)

Steps:

Cut out your flowers, bunnies  or whatever floats your boat. Or like me, I like it a bit more rustic, follow along  with a small brush and some water where you want to rip the napkin. This way you can just ‘pull’ away with some pointy scissors on a flat surface (hope that makes sense)? It’s just this way you can control easier where you rip the napkin.

Next you toss the 2 back layers of the napkin as you will just use the top layer only.

Now you place the top layer on the backside of your decorative window (or front, doesn’t matter as long as it does not get wet from rain etc.) and “glue” with the egg-white-soaked brush. Start in the middle and gently work your way out. You now can place your project on its spot. It will dry nicely and odorless! If you are tired of it and want to use a different napkin for Thanksgiving or Christmas for example; soak it with a sponge for a minute or two and wash your windows and start over. If you have questions just ask.

Waffles

I came across this yummy waffles recipe the other day and I want to share it with you. It says it is for 4 people but I find that very generous (even if you have teenagers)! The left- overs, if you have any, are easy to freeze and handy to put into a toaster later on for a quick breakfast or to use in a dessert! I like them with some fruit or (and) whipped cream! (Almost) anything with whipped cream is good, right?

Here we go:

Waffles

2 cups all purpose flour

2 tsp baking powder

1/2 tsp sea salt

2 tbsp sugar

4 large eggs, separated

2 cups milk

1/2 tsp. vanilla or the rind, finely grated, of one lemon

4 tbsp. unsalted butter, melted

  1. In a bowl, sift together flour, baking powder, salt and sugar. In a second bowl, whisk egg yolks, milk, vanilla (or lemon zest) and butter. Form a well in the dry mixture: pour in the liquid mixture. With a wooden spoon, fold together until dry ingredients are just moist.
  2. In a small bowl , whisk egg whites until soft peaks form. Gently fold whites into batter until batter is slightly lumpy and a little runny. Pour into waffle iron (which you brushed with a little oil) and bake until golden. Serve warm.

Paper Bunnies

Today I have a little project for you since Easter will be here soon! I was sorting through a pile of old books I knew nobody here would want because they were written in German. I made myself a little template out of cardboard and traced the bunnies onto some pages (usually I cut through 3 pages at once). Since I don’t like to watch TV “empty handed” this was a nice little project to do on the side. Once you have a few ready,


dust off your sewing machine and tread it with some colored or white tread. Set the stitch to -4- (you want a larger stitch) and sew them together, always stop after each paper bunny, lift the foot and pull a few inches before you add the next paper bunny (see picture).


P1040970

After you reached the desired length, leave an extra few inches and tie a large pearl, a small piece of driftwood or even a large button at the very bottom for some weight. This way the bunnies hang down pretty straight and if there is a bit of a draft in the house they don’t fly all over the place.

If you don’t have a sewing machine and want the kids involved, you can also -sandwich- two bunnies at the time between a piece of twine. That was fun and even  a bit “sturdier”.


Like my little bunnies…


Sunflowers differently…

As a photographer I am always on the lookout for cool photo opportunities. This past fall I decided to let two of my sunflowers that seemed pretty sturdy, standing in my garden instead of pulling them out. I was hoping to photograph them with a nice -hat- of snow on top of them sometime during  winter! At the end of November I received a large crate full of all sorts of Christmas lights from a neighbor. I wanted to use them up but where?  Taddaaa! Who needs a Christmas tree if you have sunflowers eh?


Sunflowerpost


Unfortunately there was never enough snow on top of their heads the way I was hoping because of all the wind we have down here near the lake. I did not do anything to the photo and actually like the orange hue in the snow…

– just a little different –

Stop and smell the roses…before & after

I don’t have a green thumb like my Mom used to have or my sister has. My little Siss grows the most beautiful Orchids while I can’t even keep a cactus alive! My husband gave me a beautiful bouquet of roses the other day for our (25th) Wedding Anniversary! Knowing that he knows (hehe), that I can’t keep plants and cut flowers alive for very long,  it was still nice to shower me with a bunch of roses! Like, who does not like roses right? Sure enough the next morning already this is what they looked like. 😦Rose10I know, it is sad! All my resurrection attempts were unsuccessful so I used the following method to still being able to enjoy the flowers for a long time to come!

I snipped the roses’ heads off about 1″ underneath the flower and discarded the stems. I have this large, rather long, vase that I filled with dry Spanish Moss (Dollar store). On top, as you will see in the pictures further down, I used some excelsior but you could also use some nice green moos that would look very nice too (I just did not have enough for this big container). Next I took some of those roses  and just stuck them right into the excelsior. They now will nicely dry this way and not much else can go wrong from now on! I won’t have to worry about watering them either! If you have some small decorative pearls from the dollar store you could add those also. What you could also do is take a nice ribbon, color of your choice, and tie that all around the vase! Empty


Rose9
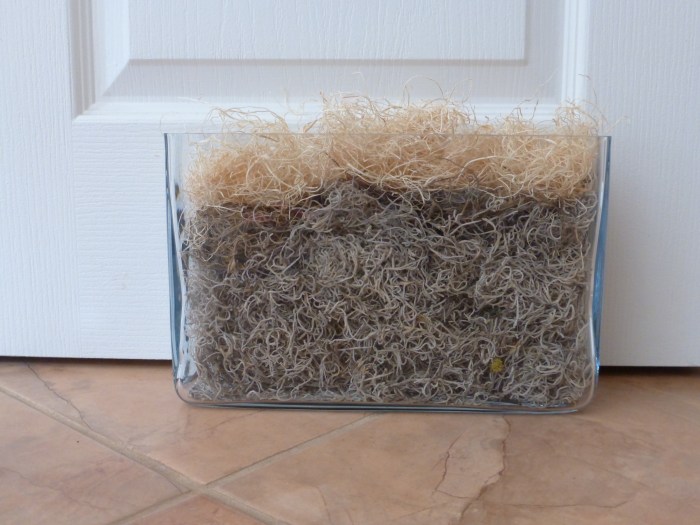
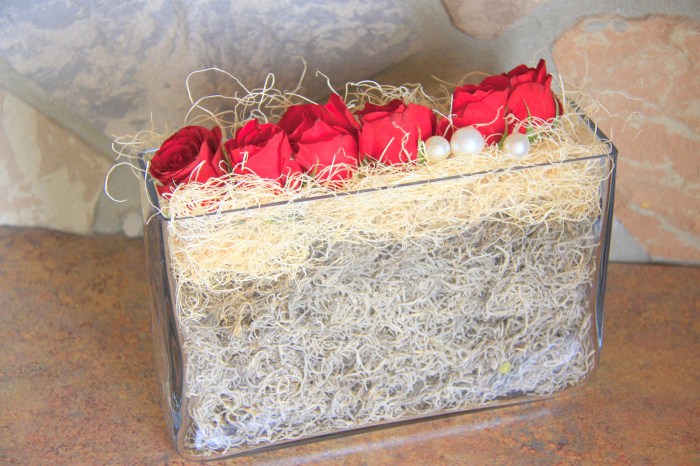
Don’t you think this looks pretty? Recycled roses :-).

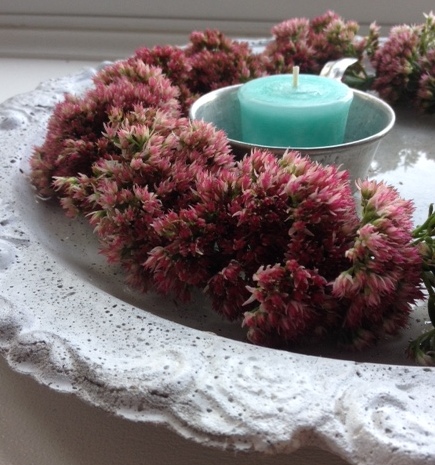
Still have a few roses left so I used one of my cement candleholders and filled it with a small amount of green moss that I had left from another project. To add some interest I incorporated a chicken feather (also from the Dollar store, I love the Dollar store 😉 and another small pearl plus I tied some twine  around it; voila!

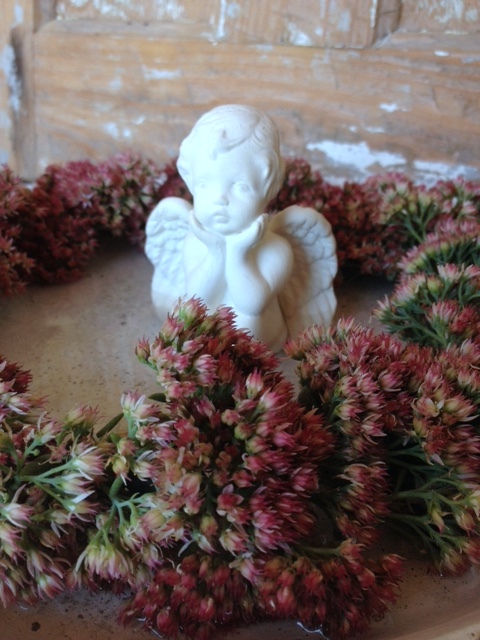
You could use all sorts of containers that you might have around for something like this. How about a teacup with saucer? Even an empty tin can will look lovely dressed up like this. The rest of the rose buds I will take apart and let them dry and use for a future project! Mission accomplished and nothing wasted, except for the stems…

Homemade Bread

Today was the perfect day to make some homemade bread! It is stormy outside so spending some time in the kitchen seems a great idea (plus the smell of homemade bread is nice)!

Here is my bread recipe:

1 2/3 cups of water

2 tsp. of salt

2 tsp. of sugar

1/2 cup dark (or light) rye flour

1/2 cup whole wheat flour

3 1/2 cups of white flour

2 tsp. of dry yeast

With this recipe I always use the bread maker to just make the dough! If you don’t own a bread maker you can also make it by hand of course.

Once the dough is finished I take it out of the pan and knead it thoroughly and form two loafs (or one big one or even some small buns) and place them onto the baking sheet which I have previously lined with baking paper. I cover the loaves with a clean tea towel which I made wet with warm water and wrung out!

This is the time when I fill a Pyrex form, (or another dish that can be placed in the oven) with about 2″ of water. Place that on the top rack in the oven and turn  the oven on to  370F! In about 20-30 minutes the bread is ready to be baked. Cut slits or a pattern onto your risen loafs and place them on the bottom rack. It takes my oven 35 minutes and the breads are baked. A good way to find out is to take one bread out and knock on the bottom. If it sounds “hollow” it is baked through! Take the loafs out and place on rack to cool. If you make buns instead, 20 min. bake time is probably enough.

PS: The water that you placed into the oven when you turned it on, makes a really nice crunchy crust from the steam it creates! Enjoy. If something is unclear email me.